Wednesday, April 29, 2009

Light and the landscape


Image: Mt Shuksan sunrise, 30D, 17-40 f4 L , f9, 19mm,GND filter, CPL. Tripod, Ball Head.

larger image here

The Magic hour, this is the time I go out if I hope to make a dramatic image, I want to be on location just prior to sunrise or sunset, preferably a place that was pre-scouted. The magic hour light is when landscape's are most dramatic, some times it can start well before the sun comes up or long after it has set, I don't know how many times I have been working a location at sunset, when as soon as the sun drops behind the horizon people are leaving for their cars, often times this is the best time to stay and photograph a landscape. I have stumbled up trails at 4:00 in the morning to reach a place, in time to get set up for sunrise. This is what landscape photography is all about, often you can come away with an image that no one will ever see, even if they have stood in the very same place as you.

Ross Murphy Images In Light

Monday, April 27, 2009

Sharpen for the web


Image : Athabasca Falls, 5D, 24-105 f4 L IS, 3 stop GND filter,f11, 1/2 sec. ISO 100. Larger Image

Some times do your photos just loose something when you re-size and post them to the web ?
Sharpen and size your work before posting to the web, don't let your web site do it for you, most web sites do a very poor job of this and you can't just re-size an image from 5600 pixels in one shot. A technique I learned from a fellow photographer for sizing and sharpening for the web. Once you have your image ready, in other words its printable, re-size your image using bicubic sharpener reducing its longest length by 1000 pixels at a time, repeat this step until you are down to about 1600 pixels on the long end and then use the sharpen tool (filter/sharpen) and sharpen it once or twice (I use CS3), at this point it will look over sharpened, re-size it one more time to 800 pixels on its longest side and see how it looks, be careful not to over do it. This usually does it for me some times I use the sharpen tool only once, some times twice and some times I have to go back and un-do one of the sharpening's, add your copyright and post it to the web. It took a little bit of experimenting and it will differ a little from image to image.
Also you may want to take a look at this or see this video. The method I described works well for me and a lot of others, so experiment a little. This should help make your images more presentable on line.

Ross Murphy Images In Light

Wednesday, April 22, 2009

Medium Format from a 35mm DSLR


Image: 5D Mk I, 70-200 f2.8 L IS, 5 shot panorama, Snake River Bend, BH-1 ball head, Gitzo CF 3530 tripod.
See larger image here


Image: 5D Mk I, 24-105 f4 L IS,
5 shot panorama, Grand Tetons, BH-1 ball head, Gitzo CF 3530 tripod.
See larger image here

Shooting panoramas can be a lot of fun, the real pay off comes when its time to print and with today's cameras, that means large format printing. I have made some panoramas that in reality are just to big to print and frame, the frame being to prohibitive from a cost stand point, I can print a shot at 24" x 72" and the cost is maybe $25 in ink and paper (my time not included) but to get it framed and mated would run around $400 for a half way decent frame with UV glass, museum glass would double that cost. I try to keep my panorama's down to 2 or 3 shots now and when ever possible I shoot them in portrait mode to get a taller picture in which case I may shoot 5-7 shots. Whats required ? a good tripod that you can level, Ball head and at minimum a 50mm lens, special pano heads are not needed unless you are shooting architecture or other technical work that requires zero parallax. Don't shoot to wide and in most cases don't use a CPL or your shots wont stitch together, know how to use exposure lock and have a decent software program for stitching and blending your work together: Ptgui, Panorama Maker or CS4 are some good programs that come to mind. Experiment and see what works. You can get shots that only a medium format digital camera could have done. I have shot panoramas from 24mm to 170mm
it is very easy, you need to move fast in dynamic conditions, like seascapes and landscapes, try dry shooting the shot first to see what you will get and do a few shots, then change focal length and try it again.

Ross Murphy Images In Light

Monday, April 20, 2009

Variable Neutral density Filters

Image:5D Mk, 24-105 f4 L IS, Variable ND Filter, 20s exposure at f/11.


Image:40D, 24-105 f4 L IS, Variable ND Filter, 1s exposure at f/11.


Image: 5D, 24-105 f4 L IS, Variable ND Filter, 25s exposure at f/9.

Image: 5D, 24-105 f4 L IS, Variable ND Filter, 30s exposure at f/11.
Adding artistic impression to images with long exposure is easy to do with a little experimentation and the right equipment.

To smooth out water or slow it down, you need to reduce the amount of light reaching the camera sensor, a quick and easy way to do this is by adding a neutral density filter, the most versatile that I have found is the Variable ND filter made by Singh Ray it allows for 8 stops reduction in light far more than using a CPL or other type of ND filter, it takes a little bit of experimentation, but it can be a lot of fun.

Results can mean images far beyond your expectations. The use of a sturdy tripod is a must.

Learn how to use the bulb mode on your camera for even longer exposures.

Ross

Images In Light

Sunday, April 12, 2009

Mega Pixels, when is enough, enough ?


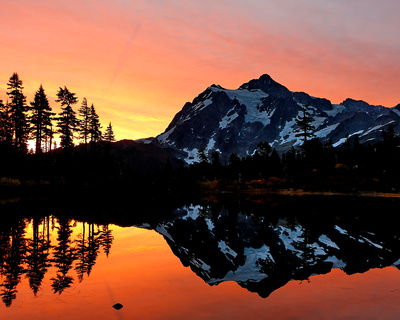
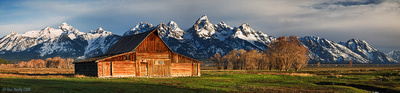
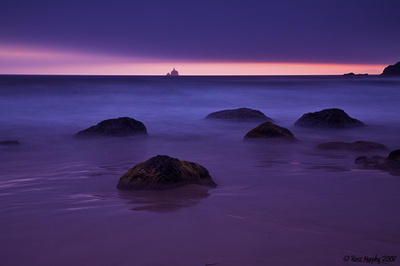
                            Image: 5D, 24-105 f4 L IS, 1/25s at f 11, 67 mm, on tripod, no crop.

When is enough, enough. Has the point already been reached ? For point and shoot cameras it was probably way back at 6mp, For some applications with APS-C, I think the answer is yes, some people are saying that diffraction is not an issue, maybe theoretically it isn't, but practically, I believe it is, the 15mp is the example I refer to, for a lot of work with a crop sensor this wont be an issue, however my findings with that resolution showed diffraction problems at f11 with fine detail in landscape photos, this, I believe is the best reason to go Full Frame for landscape photography and 1.6 crop should have stayed at 12mp. An option for future cameras is to increase the sensor size, maybe from 1.5 to 1.3 for crop. For full size we are at 25mp and I have no complaints at 21mp, so where is the number for full frame 35mm sensors ? we will have to wait and see, but if I where to hazard a guess, I would say 28mp. 21mp is enough for me, if I feel a need to print larger than I do now, I will go to medium format. With a well exposed image I can currently print a 24 x 36 on an ipf6100, matted and framed that becomes 32 x 44, that's pretty big and is enough for most fine art work, some of my panoramas can be printed a lot bigger, for posters and billboards its a different story. Lets look at the 5D Mk II, its pixels are the same size as a 20D which is 6.4 µm, the 50D is at 4.7 µm, a 50D scaled up would be around 38 mp I believe, that I think is to far and I hope Canon doesn't go there, again those pixels may be very good for modeling and bird photography, but landscape is more demanding on a sensor, the amount of detail I see in some landscape shots is immense and I hope the camera companies keep this in mind. The older lens's are also a problem, new lens's are required to keep up the resolving power of these high mp cameras and they are getting very expensive, the new 24mm tilt/shift lens is retailing for around $2200 and the 17mm for $2500, the 24mm f1.4 is $1700 it goes on and cost's start approaching medium format territory.

Update: With the improvement in lenses and sensors since I first wrote this article, I am upping the MP's that I want to somewhere under or around 50mp. I am currently using a 5Dmk III, D800E and just ordered a A7r II to use with my Canon lenses. I will update this article again soon....

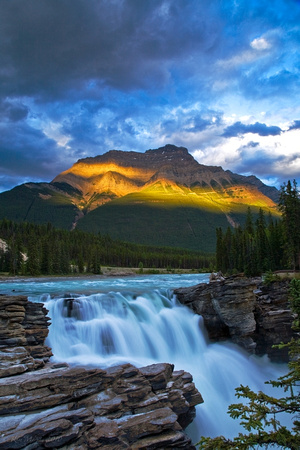
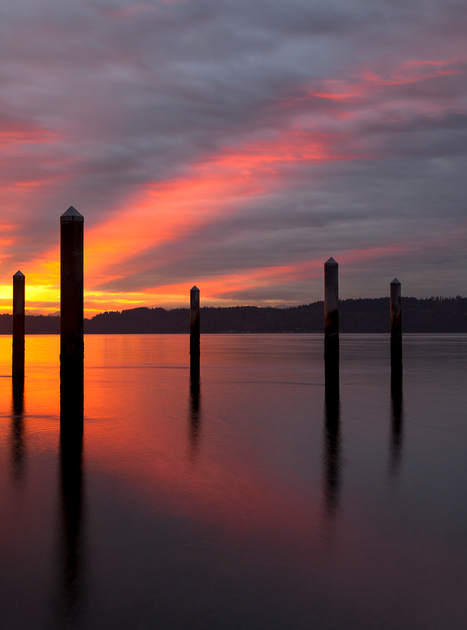
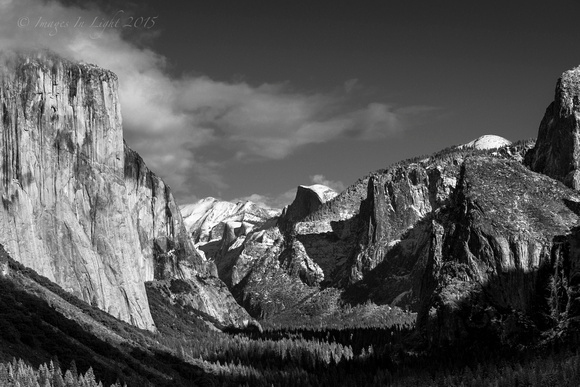
Image: D800E, AF-S 70-200mm f/2.8G ED VR II

Ross

Images In Light

Thursday, April 9, 2009

What I have been waiting for in exotic Glass


Zeiss will be making the Distagon T* 3.5/18 available in Canon EF mount

Manufacturer: Carl Zeiss
Model: Distagon T 3.5/18 ZE
Focal Length: 18mm
Maximum Aperture: f/3.5
Minimum Aperture: f/22
Mount Type: Canon EF Mount
Lens (Elements): 13
Lens (Groups): 11
Minimum Focus Distance: 0.3m
Filter Size: M 82 x 0.75
Dimensions: ø 87 mm, length 84 mm
Weight: 470g

Should be available by years end for around $1200, this will be an incredible wide angle lens on a Full Frame camera, I look forward to seeing test's on this lens.

Ross Murphy Images In Light

Wednesday, April 8, 2009

Learning to Fly

Who says the 5D Mk II can't make good video, don't tell that to Tom over at Time Scapes, he has done some terrific work Here take a look, it might change your mind about video in Pro DSLR's and also shows how well time laps photography turns out with some good editing.

Ross Murphy Images In Light

Monday, April 6, 2009

Filters in the digital age


Image: Canon 5D and 17-10 F4 L, Lee 3 Stop GND filter, f11 at 17 mm, no crop.
 Larger Image

Filters are still required in the digital age of photography, not as much as they where in the film days, but in order to get proper exposure on a lanscape that has a very wide dynamic range or to remove reflections from water, we still resort to using filters.


The main filter system in my bag is the Lee Graduated Nuetral Density filter or GND for short. The main task of these filters is to reduce the amount of light contacting the camera sensor while still being able to use the lens aperture you need. Graduated filters, as the name implies, start the transition from the center of the filter and graduate to the edge in varying degrees, measured in stops.

The top photo is an example of where a GND filter is needed, if a filter was not used and you where to meter on the sky the land would be under exposed or if you metered on the land the sky would have been over exposed, in this image a 3 stop filter was used to even out the overall exposure. The filters I use are made by Lee and Singh-Ray I use the foundation kit with 4 x 6 filters, for wide angle I use there special wide angle hood with one filter slot. I carry a 1, 2 and 3 stop GND a 3 stop reverse GND and an 8 stop variable ND. The reverse filter is for shots like a sunset or sunrise where the brightest part of the image is closer to the middle of the image. The variable ND is a great filter for shooting seascapes, this is a filter that I will talk about in another blog.

 The Lee Big Stopper a 10 stop ND filter for maximizing the effect.

Circular Polarizer: The CPL is another filter that is still required for reducing reflections and a good quality filter should be used to prevent color cast's. B + W is my choice, I use the slim 77mm and reducing rings when needed. These filters also increase the color saturation of trees and blue skys and add contrast to clouds, there should be one in every photographers bag. A word of caution on CPL and wide angle landscapes, if you have a lot of blue sky the CPL will only cover part of the sky and you will end up with un-even polarization that will ruin your image.

Ross Murphy Images In Light

Friday, April 3, 2009

Photographer Sugimoto strikes a Stone Age deal with U2

IMAGE: By Hiroshi Sugimoto

Interesting story about one of Japans top photographers Hiroshi Sugimoto and U2's latest album cover "No Line On The Horizon", see it here at the Japan Times.


Ross Murphy Images In Light